
Plugin: Sharpen your photos on WordPress with ImageMagick
ByThis post is also available in:
 Dutch
Dutch
Tired of having blurry lifeless WordPress images? I wrote a WordPress plugin for you. This plugin sharpens resized JPG image uploads and it works with ImageMagick so it keeps quality, EXIF information and color profiles. It also maintains the crops and other image proportions.
And as a bonus: it can do automatic leveling too, for perfect contrasts.
To me, as a photographer, it’s very important to give you the best presentation of my work in the best possible quality. Colors, sharpness: everything has to be perfect, especially here. I mean, you probably know how bad the Facebook compression is for photos, don’t you?
I use the popular WordPress platform to showcase my work. Unfortunately, WordPress resizes images after uploading without sharpening them. In the world of photography there’s a golden rule: sharpening after resizing. Always.

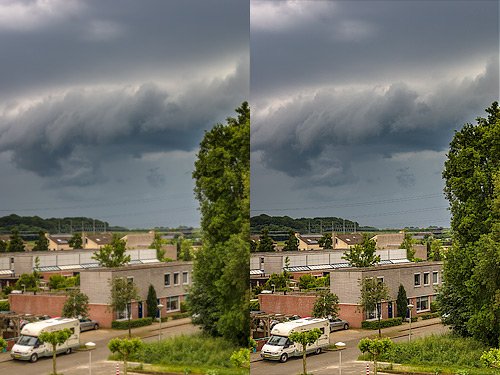
On the left you see the unsharpened image. On the right you see the sharpened, crispy result.
Ramona in the image above is perfectly sharp on the right. Here the image is slightly sharper than it should, because my plugin is also applied automatically on this blog post, but you get the idea. Effectively, in this post the image has been double sharpened as a result.
Your host needs to have the imagick PHP module installed. The plugin has a built-in check.
If you don’t have the PHP imagick module installed you can still sharpen your images by using the Sharpen Resized Images plugin. It sharpens the images by using lower quality GD, so it strips EXIF data and it strips color profiles.
Also here unsharpened on the left and on the right you see the crispy, sharpened result.
After you enable the plugin it will only sharpen new uploads. There are no settings required. If you want to sharpen your already uploaded images you will also need the Regenerate Thumbnails plugin. Still no differences? Clear your browser cache. If you’re using Varnish cache or other server caches, empty them. Sharpening only works with JPG files.
I defined the for me optimal amount of sharpening. You can change it though by going in your WordPress Admin Settings to the IM Sharpen Images entry. The default settings are fine though (Radius 0, Sigma 0.5, Amount 1, Threshold 0). I defaulted the threshold to 0 because personally I want to retain fine skin details in my photos. You can change it to 0.05 for noisy images if it sharpens noise too much.
Downloading & installing:
The best way is automatically (you’ll also receive plugin updates):
Search in your WordPress installation while adding a new plugin for ImageMagick Sharpen Resized Images, install it and activate it.
Or:
Visit the plugin page on WordPress.org to download the plugin by following this link
Or:
Download Version 1.1.3 here (ZIP): ImageMagick Sharpen Resized Images Plugin
To install the plugin, download and unzip the file above. Upload the imagick-sharpen-resized-images folder to the /wp-content/plugins/ directory. Activate the plugin through the ‘Plugins’ menu in WordPress.
Check http://codex.wordpress.org/Managing_Plugins#Installing_Plugins for more detailed installation instructions.
In your WordPress Settings you’ll have a new admin entry: IM Sharpen Images.
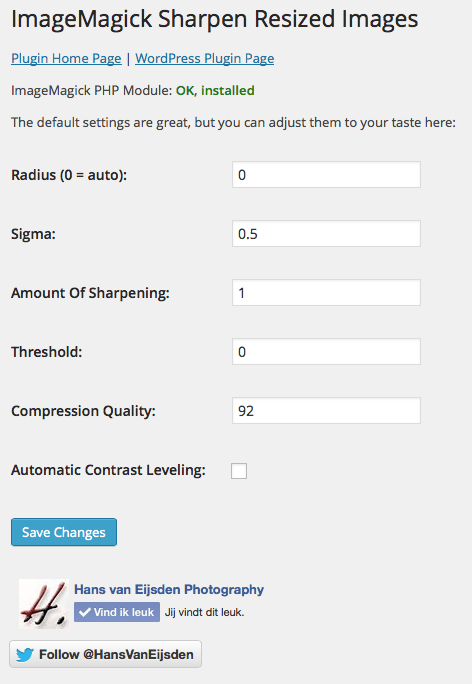
Imagick Sharpen Resized Images Settings
Could you please give more details on how to install the “imagick PHP module?” I can’t seem to install it on my WordPress site. There is no zip file.
Thanks for your help!
Hi Pete,
Thanks for your comment. The imagick PHP module doesn’t come with a WordPress zip file, because it’s not a WordPress module but a PHP module.
You cannot install the imagick PHP module on your WordPress site directly (via the WordPress Settings), this needs to be done in the PHP config on your server.
The imagick PHP module is a fairly common module for PHP. Many web hosts install it by default, because it delivers way better image quality and it takes less system resources than the default PHP GD equivalent.
You need to contact your web hosting company with the request to install the imagick PHP module (and the ImageMagick software) on your server. Or, sometimes you can do it by yourself, for example, if you’re using cPanel there’s an option to install additional PHP modules (see EasyApache).
If you’re maintaining your own server, you can install the imagick PHP module by yourself and that’s easy. If your server is using Debian, you can use the DotDeb sources: http://www.dotdeb.org/2014/06/08/php-5-5-13-for-debian-wheezy/.
And if you’re compiling PHP by installing PHP from source (like I do), you can install the imagick PHP extension easily by reading http://www.php.net/manual/en/install.pecl.php.
Good luck & enjoy! 🙂
Thanks for your quick response!! I’ll give it a try.
i am try to test. now a work. i try everything. is why not working?
http://i.hizliresim.com/pBombL.jpg
i am doing new upload. not a different. i want to upload every photo sharpen. resize for me not a important.
Hi Yunus, I’m sorry to hear that it’s not working for you.
There can be many reasons, from your screenshot everything seems to be okay.
Currently we can only test it on the newest PHP (7.0.1) and with the “phpseven” branch of the Imagick extension: https://github.com/mkoppanen/imagick/tree/phpseven
After the new year I will debug it here on my own side and if there are any problems with the plugin, we will release a new version.
Thank you! happy new year.
Hi Hans. I tried to use you plug-in but I got a fatal error: Fatal error: Class ‘Imagick’ not found in /home/robink11/public_html/wine-wanderer.com/wp-content/plugins/imagemagick-sharpen-resized-images/imagick-sharpen-resized-images.php on line 281
How can I fix this? I seemed to be able to download the plug-in without a problem which made me think everything was okay with the PHP module on my server.
Thanks.
Hi, I have the same problem. Please help.
Hi Robin & Tomas, Thanks for your messages and thanks for your patience.
Currently I’m testing with other servers, because here I cannot replicate the issue locally.
What does the plugin say? Does it say in green “OK, installed”?
You should mention the difference in filesize after sharpening, as it adds around 1/3.
Hi Hans
I’m trying to get imagick to work on my locally hosted (xampp) wordpress site.
Your plugin recognises(!) I have imagick installed but when uploading new images and when resizing old images GD is still used instead of imagick.
Any ideas about what could be going wrong?